2.17. lib - PyQt5 (GUI)
Qt framework is a very powerful cross-platform GUI builder. It is written in C++ and it was ported, over to python as pyqt. The python documentation is nearly non-existent since it would sort of be a duplicate of the Qt C++ docs (PyQt4 if PyQt5 data is missing, PyQt5 and Qt). This package has a very steep learning curve, so take it slow and try to get used to reading the C++ docs.
2.17.1. Installation
Note if you get a Could not find a version that satisfies the requirements during a pip install,
then your current python version is not supported by pyqt.
pip install pyqt5 pyqt5-tools
2.17.2. Designer (GUI builder)
PyQt comes with an awesome drag and drop GUI builder designer.exe.
The tool (and all other pyqt .exe) will be placed in:
lib/site-package/pyqt5_tools/Qt/bin
or if you are using virtualenv, it will simply be under Scripts
Construct your GUI by drag/drop method and save it as a
.uiConvert your
.uito python code withpyuic5.exe
# -x to make it executable (creates __name__ == "__main__")
# -o to specify output filename
pyuic5.exe -x -o outputfilename.py designerfilename.ui
2.17.3. Designer to Python code setup
An efficient way to use Qt Designer is export out the widget code then without alterations of your
designer created code we import it into the logic modules. This will save a lot of time when we have to
go back to designer and adjust something or add a new widget. We simply re-export out the python code
and the import takes care of the rest. The following example is a good starter code that handles the
exported form.py designer exported python code.
QtWidgets: App > MainWindow > all widgets QtWidgets
QtCore: brains of qt QtCore
Qt: misc qt library items(ex: keys, mouse) Qt
Keys: QKey
Mouse Keys: QMouseButton
QPoint: hold point properties (ex: position) Qpoint
QEvent: all event types, but not sensor (ex: KeyPress) QEvent
QtGui: event sensors and graphical editor (ex: colors, fonts etc) QGui
# form.py is the designer exported python code
from form import Ui_MainWindow
# QtWidgets is the collection of all Qt windows (QApplication > QMainWindow > widgets, events)
# QtCore is the collection of keyboard/mouse/event types
# QtGui is the collection of event sensors and graphical editors like color/font
from PyQt5 import QtWidgets, QtCore, QtGui
# sys is call to handle any arguments passed in from the terminal (optional)
import sys

class Ui(QtWidgets.QMainWindow, Ui_MainWindow):
    def __init__(self, *args, **kwargs):
        # initializes QMainWindow object (so that we can call: MainWindow.attribute)
        QtWidgets.QMainWindow.__init__(self, *args, **kwargs)
        # sets up the Designer widgets that we imported
        self.setupUi(self)

        # to enable event handling (if this not stated python will garbage collect all events)
        self.installEventFilter(self)

    # overwrite the Qt event filtering method
    #   (by default it is empty so we edit it to handle key presses
    def eventFilter(self, source, event):
        # lets see how we setup a custom key event
        if (event.type() == QtCore.QEvent.KeyPress and
                event.key() == QtCore.Qt.Key_A):
            print('you presses the "A" key')

        # first check if a key was pressed, then check if that event matches ctrl+c
        #  which is already built into qt as QKeySequence.Copy
        if (event.type() == QtCore.QEvent.KeyPress and
                event.matches(QtGui.QKeySequence.Copy)):
            # now pipe the event to any method to logic handling
            self.customcopy()

        # this is to overwrite the existing event filter method
        return super(Ui, self).eventFilter(source, event)

    # our custom method to handle what happens when we hit ctrl+c
    def customcopy(self):
        print("you hit ctrl+c")

if __name__ == "__main__":
    # create an instance of Qt (pass in sys.argv allows args to be passed it from terminal)
    app = QtWidgets.QApplication(sys.argv)
    # initialize the MainWindow
    gui = Ui()
    # shown the MainWindow
    gui.show()
    # app.exce_() runs the mainloop, and returns 0 for no error, 1 for error
    sys.exit(app.exec_())
2.17.4. Events
paintEvent
resizeEvent
keyPressEvent and keyReleaseEvent
contextMenuEvent
mouseMoveEvent and mouseReleaseEvent and mouseDoubleClickEvent
2.17.5. Using Builtin Signals
Qt widgets already come with a ton of handy signals already coded up that handle events for you. See the
Custom Signal/Connect/Emit Setup section to get a in depth walkthrough on how a signal works but in short,
a signal is already hocked up event handler for a widget action (like the press of a button). You only
have to connect up what happens when a specific signal is emitted (an event happens like pressing a button)
and the rest is taken care of for you (for builtin signals). Lets see how to hock up a builtin signal from
QLineEdit text filed to a QLabel text when the “Enter” is pressed from the QLineEdit widget:
from PyQt5 import QtCore, QtGui, QtWidgets


class Ui_MainWindow(object):
    def setupUi(self, MainWindow):
        MainWindow.setObjectName("MainWindow")
        MainWindow.resize(207, 102)
        self.centralwidget = QtWidgets.QWidget(MainWindow)
        self.centralwidget.setObjectName("centralwidget")
        self.lineEdit = QtWidgets.QLineEdit(self.centralwidget)
        self.lineEdit.setGeometry(QtCore.QRect(40, 10, 113, 20))
        self.lineEdit.setObjectName("lineEdit")
        self.label = QtWidgets.QLabel(self.centralwidget)
        self.label.setGeometry(QtCore.QRect(70, 40, 47, 13))
        self.label.setObjectName("label")
        MainWindow.setCentralWidget(self.centralwidget)
        self.menubar = QtWidgets.QMenuBar(MainWindow)
        self.menubar.setGeometry(QtCore.QRect(0, 0, 207, 21))
        self.menubar.setObjectName("menubar")
        MainWindow.setMenuBar(self.menubar)
        self.statusbar = QtWidgets.QStatusBar(MainWindow)
        self.statusbar.setObjectName("statusbar")
        MainWindow.setStatusBar(self.statusbar)

        self.retranslateUi(MainWindow)
        QtCore.QMetaObject.connectSlotsByName(MainWindow)

        # setup the connection from our QLineEdit widget to our method
        self.lineEdit.returnPressed.connect(self.CustomMethod)

    def retranslateUi(self, MainWindow):
        _translate = QtCore.QCoreApplication.translate
        MainWindow.setWindowTitle(_translate("MainWindow", "MainWindow"))
        self.label.setText(_translate("MainWindow", "TextLabel"))

    # our custom method
    def CustomMethod(self):
        # grab the text from the text field
        text = self.lineEdit.text()
        self.label.setText(text)


if __name__ == "__main__":
    import sys
    app = QtWidgets.QApplication(sys.argv)
    MainWindow = QtWidgets.QMainWindow()
    ui = Ui_MainWindow()
    ui.setupUi(MainWindow)
    MainWindow.show()
    sys.exit(app.exec_())
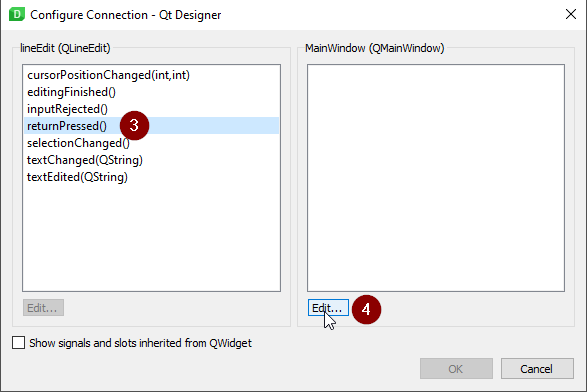
We can also have Qt Design create the self.lineEdit.returnPressed.connect() line for us but it doesn’t
really save much time. Note that we will have to replace the method name since pyqt Designer does not
allow us to type ``self.Here are the steps:


2.17.6. Custom Signal/Connect/Emit Setup
Signals are a great way to jump in and out of function when a certain event or condition was satisfied. As with any problem, this what a signal does can also be achieved without ever using signals but signals can make more of a logical sense. There are 4 pieces to a signal setup/use:
Signal: Class Attribute; Defines the signal name, and sets up argument types (types must be setup)
Define Slot: Class Method; Defines the method that is called when a signal is emitted
Connect: Inside __init__; Connects the Signal Class Attribute to the Class Method
Emit: A Call; Emit a signal
# form.py is the designer exported python code
from form import Ui_MainWindow
from PyQt5 import QtWidgets, QtCore, QtGui
import sys

class Ui(QtWidgets.QMainWindow, Ui_MainWindow):
    # STEP 1: Define a "SIGNAL", and define the type or argument that is being passed
    #  in this example: we can pass a bool and str argument when a emit occurs
    a_key_pressed = QtCore.pyqtSignal(bool,str)


    def __init__(self, *args, **kwargs):
        QtWidgets.QMainWindow.__init__(self, *args, **kwargs)
        self.setupUi(self)
        self.installEventFilter(self)

        # STEP 3: "CONNECT" a signal to a "SLOT"
        a_key_pressed.connect(self.slot_a_key_pressed)


    # overwrite the Qt event filtering method
    #   (by default it is empty so we edit it to handle key presses
    def eventFilter(self, source, event):
        # lets see how we setup a custom key event
        if (event.type() == QtCore.QEvent.KeyPress and
                event.key() == QtCore.Qt.Key_A):
            print('you presses the "A" key')
            # STEP 4: "EMIT" the signal in practice
            a_key_pressed.emit(True,"emitted signal A")

    # STEP 2: define a "SLOT" that handle what happens when the signal is emitted
    def slot_a_key_pressed(self,arg1,arg2):
        print(f"It is {arg1} that we {arg2}")


 if __name__ == "__main__":
    # create an instance of Qt (pass in sys.argv allows args to be passed it from terminal)
    app = QtWidgets.QApplication(sys.argv)
    # initialize the MainWindow
    gui = Ui()
    # shown the MainWindow
    gui.show()
    # app.exce_() runs the mainloop, and returns 0 for no error, 1 for error
    sys.exit(app.exec_())
2.17.7. Path File Browser
There are several file/folder browser dialogs available to the user:
QFileDialog.getExistingDirectory(self, title, path, filter)where filter: “Images (*.png *.jpg);; Text(.txt)”
# NOTE: this is another method to the example shown above under "Designer to Python code setup"

def getpath(self):
    path = QtWidgets.QFileDialog.getExistingDirectory(self, 'Select Directory')
    return path
QFileDialog.getOpenFileName(self, title, path, filter)similar to directory expect this opens the file for streaming this can return a returns a list no matter what, if a single file was selected or multiple.
# NOTE: this is another method to the example shown above under "Designer to Python code setup"
def openfile(self):
    filename = QtWidgets.QFileDialog.getOpenFileName(self, 'Select File')
    if filename[0]:
        with open(filename[0], 'r') as f:
            data = f.read()
QFileDialog.getSaveFileName(self, title, path, filter)similar to file expect this opens the file for streaming
# NOTE: this is another method to the example shown above under "Designer to Python code setup"
def openfile(self):
    filename = QtWidgets.QFileDialog.getSaveFileName(self, 'Select File to Save')
    if filename[0]:
        with open(filename[0], 'w') as f:
            f.write(data)
2.17.8. MessageBox Popup
# NOTE: this is another method to the example shown above under "Designer to Python code setup"

# the following is useful as error handling popup
try:
    # some code
except Exception as e:
    msgbox = QtWidgets.QErrorMessage(self)
    msgbox.showMessage(str(e))
2.17.9. Common Widgets And A Short Description
2.17.9.1. QLabel
A un-editable text field has the following methods
setText()assign text to the Labelclear()clear the text from the Label
2.17.9.2. QLineEdit
An editable text field has the following methods
setEchoMode(int)possible inputs:0: Normal, what you type is what you see
1: NoEcho, you cannot see what you type but the text is still stored
2: Password, each character types is instead replaced by “*”
3: PasswordEchoOnEdit,it displays the characters while typing but is then “*” out afterwards
maxLength()specify how many characters can be typed into the text fieldsetText()set a default texttext()get the text out of the text fieldclear()clears text fieldsetReadOnly()text field cannot be edited but it can be copiedsetEnabled()by default =Truebut can be passed aFalseto disable from edit/copySignals:
QLineEdit.textChanged.connect(custom_method_pipe)when text is changedQLineEdit.returnPressed.connect(custom_method_pipe)when enter is pressed from textbox
2.17.9.3. QPushButton
Simple on/off button that emits a signal when clicked, with the following
2.17.9.4. QTableWidget
setRowCount()redefine how many rows there are in the table (similar for column)rowCount()returns the number of rows in the table (similar for column) note this is not the row that contain data, but all rowsclear()clears all content from the entire tablesetItem(row,col,QtWidgets.QTableWidgeItem(data))where row and column areintanddatais astr
# NOTE: this is another method to the example shown above under "Designer to Python code setup"

# set cell value
def mycellsetter(self, value):
    # input value must be a string
    row = 0
    col = 0
    self.table.setItem(row,col,QtWidgets.QTableWidgetItem(str(value)))

# to get cell value
def mycellgetter(self):
    row = 0
    col = 0
    # return values will always be strings
    return self.table.item(row, col).text()

# to iterate through a tableWidget
def tableiter(self):
    maxcol = self.table.model().columnCount()
    maxrow = self.table.model().rowCount()
    for c in range(maxcol):
        for r in range(maxrow):
            # note that empty cells show up as None type
            if self.table.item(r,c) != None:
                # to get the actual value stored we have to call .text() on the current cell
                self.table.item(r,c).text()

# to copy from table
def copySelection(self):
    # note this is tablename specific (table name = "table")
    selection = self.table.selectedIndexes()
    if selection:
        rows = sorted(index.row()) for index in selection)
        columns = sorted(index.column() for index in selection)
        rowcount = rows[-1] - row[0] + 1
        colcount = columns[-1] - columns[0] + 1
        table = [[''] * colcount for _ in range(rowcount)]
        for index in selection:
            row = index.row() - rows[0]
            column = index.coumn() - columns[0]
            table[row][column] = index.data()
        stream = io.StringIO()
        csv.writer(stream, delimiter='\t').writerows(table)
        QtWidgets.qApp.clipboard().setText(stream.getvalue())

# to paste to table
def pasteSelection(self):
    # note this is table name specific (table widget name = "table")
    selection = self.table.selectedIndexes()
    model = self.table.model()

    if selection:
        buffer = QtWidgets.qApp.clipboard().text()
        rows = sorted(index.row() for index in selection)
        columns = sorted(index.column() for index in selection)
        reader = csv.reader(io.StringIO(buffer), delimiter='\t')
        if len(rows) == 1 and len(columns) == 1:
            for i, line in enumerate(reader):
                for j, cell in enumerate(line):
                    model.setData(model.index(row[0] + 1, columns[0] + j), cell)
        else:
            arr = [[cell for cell in row] for row in reader]
            for index in selection:
                row = index.row() - rows[0]
                column = index.column() - columns[0]
                model.setData(model.index(index.row(), index.column()), arr[row][column])
2.17.9.5. Indexing A QTabWdiget
def tabpiper(self):
    if self.yourtabwidgetname.currentIndex() == 0:
        print('you are on the first tab')
    elif self.yourtabwidgetname.currentIndex() == 1:
        print('you are on the second tab')
2.17.10. PyInstaller Packing TroubleShooting
Dealing with “ImportError: unable to find QtCore.dll on PATH”
Run on pyinstaller 3.5 and PyQt5 5.12.3 (PyInstaller Link)
Create spec file via (pyi-makespec filename.py)
Add to gui.spec datas=[(‘fullpath/site-packages/PyQt5/Qt/bin/*’,’PyQt5/Qt/bin’)] then run pyinstaller gui.spec –onefile
2.17.11. GUI Lockup - Multithreading
Execute multiple tasks without locking up the GUI. Threading has a few parts:
class initialization and class instance: where we feed information to the thread class, like the GUI window
class run method and class start():
threadname.start()calls therunmethod from the thread classthreads join: join all of the threads together
# Qt Designer Output of 2 progress bars
from PyQt5 import QtCore, QtGui, QtWidgets


class Ui_Dialog(object):
    def setupUi(self, Dialog):
        Dialog.setObjectName("Dialog")
        Dialog.resize(400, 300)
        self.progressBar = QtWidgets.QProgressBar(Dialog)
        self.progressBar.setGeometry(QtCore.QRect(130, 80, 118, 23))
        self.progressBar.setProperty("value", 0)
        self.progressBar.setObjectName("progressBar")
        self.progressBar_2 = QtWidgets.QProgressBar(Dialog)
        self.progressBar_2.setGeometry(QtCore.QRect(140, 160, 118, 23))
        self.progressBar_2.setProperty("value", 0)
        self.progressBar_2.setObjectName("progressBar_2")

        self.retranslateUi(Dialog)
        QtCore.QMetaObject.connectSlotsByName(Dialog)

    def retranslateUi(self, Dialog):
        _translate = QtCore.QCoreApplication.translate
        Dialog.setWindowTitle(_translate("Dialog", "Dialog"))

# our code for threading on 2 progress bars without locking up the GUI
import sys
import threading
import time
from PyQt5.QtWidgets import QDialog, QApplication

class GUI(QDialog):
    def __init__(self):
        super().__init__()
        self.ui = Ui_Dialog()
        self.ui.setupUi(self)
        self.show()
class aThread (threading.Thread):
    counter=0
    def __init__(self, gui, ProgressBar, steps):
        threading.Thread.__init__(self)
        self.gui=gui
        self.counter=0
        self.steps = steps
        self.progreassBar=ProgressBar
    def run(self):
        print ("Starting " + self.name)
        while self.counter <=100:
            time.sleep(0.5)
            self.progreassBar.setValue(self.counter)
            self.counter+=self.steps
        print ("Exiting " + self.name)

if __name__=="__main__":
    app = QApplication(sys.argv)
    gui = GUI()
    thread1 = aThread(gui, gui.ui.progressBar)
    thread2 = aThread(gui, gui.ui.progressBar_2)
    thread1.start() # to start the thread (calls .run())
    thread2.start() # to start thread2 (calls .run())
    gui.exec()  # this is to keep the gui window responsive
    thread1.join()  # bring back the tread and merge data
    thread2.join()
    sys.exit(app.exec_())